Thursday, June 18, 2009

Blog traffic from Youtube

youtube trafficHow to get blog traffic from youtube? Uploading video to youtube is easy but what can we do to generate traffic to our blog from the video?

Here are important ideas and steps which helps to bring traffic from youtube video.

First I will list three basic steps and then will discuss each step in detail.

1) Create your own video
2) Register with youtube and Upload your video with correct title.
3) Incorporate and mention your blog url at appropriate places on youtube.


1) Now we will look at first step as what kind of video can be prepared?
You need something related to your blog subject. Website owners use youtube for marketing and selling their products with sales video but I am not talking of that.
We need video related to our blog subject. In general humorous video, how to video, some catchy dance and music video, amazing and interesting facts video, educational video etc. will catch attention and will get many views.
e.g. I can prepare video related to some of the posts on this blog as How to shift to custom domain,How to get blog traffic or How to make money from blog.
Many bloggers have personal blogs so they can have video on making some recipe, how to swim or some kitchen tips and tricks, funny video of their animal or pet, video of the places they have visited, video of sports they play or teaching or giving tips on some sports, video on party they have organized etc.

You can capture video using webcam, cellphone or handy cam or whichever is most suitable. Youtube accepts many file formats for video uploading so file format is not big issue but if you go for high quality video then file size is too large. So normal resolution is ok. Also read youtube help regarding this. Video file size also increases with the time so as far as possible keep video length from 5 minutes to 15 minutes.(for few subjects it can be longer). Picture and sound quality should be clear and if you know little of video editing it helps you to edit the video.

2) If you are not already registered, you need to register at youtube.com. After login you will find a yellow color Upload button on right hand corner. Then click on Upload video file. Then clicking on Upload video gives you a browse window to choose video from your computer hard disk and upload it. You also have to enter title, description,tags and category. And then click save. It takes some time for your video to go live. Since your video will appear in youtube search result based on video title and description, it is very important to choose correct post title and description. Hence do some research on youtube by searching related videos and enter the keywords you are looking for in your video title and description. Also enter your blog url in description.

3) Now you need to add your blog url in the video. Go to my video and then Annotations then click on Add note (see the image below) it gives you a window on the video asking "Enter your text here". Type your blog url here then you can change color if required , then holding mouse cursor you can drag it from center to one of the corner so that it does not come in the way of watching video.
blog traffic from youtube
Now you have to choose time period for which this will appear on video so you can select full time starting from 0.0 to full length of video. Now you have to click on save and publish.
Check your blog url is appearing on video or not.
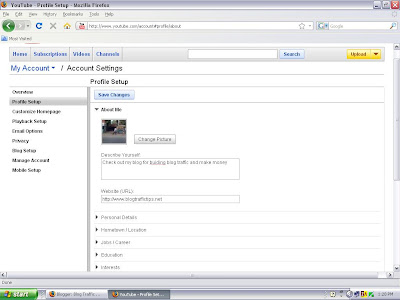
You also need to enter your blog url in your profile. You need to go to Account > Profile setup > website. See the picture below.
blog traffic tip youtube
Now logout and search youtube with keyword you have mentioned in video title and see where you can find it in search results and watch the video. You can fine tune the video title and description if required for better ranking. Send emails to your friends giving url of video and asking them to watch the video and rate it. Getting few higher ratings creates good impression on visitors.


Your account at youtube also has insight and statistics option under My account where you can come to know from where visitors has come to watch your video.
So what are you waiting for ? Shoot a video and fire!

Sunday, June 14, 2009

Blogging tips for beginners - Part 2

These blogging tips are update on my last post on Blogging tips for beginners. These are mainly using some blogger.com features which are actually useful but rarely used by bloggers.

Blogging tip #26 - Scheduling

Please write regularly for your post because search engine likes blogs which are updated regularly.
Many times due to lack of time or other reason we do not get time to write for the blog so when ever you have some thoughts or ideas to write something straight a way write into new post and do not publish but save as draft. Later on add and edit into it as you get time.
Also there is one feature on blogspot blogs called scheduling. So when ever you are writing more than one post do not publish them at a time. Rather than this , publish one post and schedule the publishing of more posts on future dates. You can do this by clicking post options below the post editor window and then change date , time under Post date and time and then click publish. See the picture below (click to enlarge).

blogspot-scheduling
Wordpress blogger can do this by entering future date and time located at Publish window on right hand sidebar. See the picture below.

wordpress-scheduling
This helps you to take vacation from blogging , search engine benefit and good impression on visitors.

Blogging tip #27 - Adding free content

The other important feature of blogger.com is you can have free relevant and interesting content for your blog with add video bar and newsreel option. You need to go to Layout > Add a gadget > then select Video bar or Newsreel . You can enter keywords related to your blog subject and save. This will display related content on sidebar of your blog. This content gets updated automatically.
e.g. check news on right hand sidebar of Vegetarian Bloggers.

Blogging tip # 28 - Adding special gadget

When we click on Add a gadget a list of basic 20 gadgets is shown.But if you look at left side you can find categories as new, tools, communication, fun and games, finance, sports, life style and technology. There are thousands of gadgets for each category so you can find gadget suitable to your blog subject.
e.g.I have added a domain check gadget on right hand side bar of this blog from technology category.
Check sidebar of Urja's Paintings blog for fish game.

blogger-gadgets,blogging tips

I will keep more blogging tips posting . Please leave your comments.


Thursday, May 28, 2009

25 Blogging tips to build better blog for beginners

During my surfing of the net and participation in discussions I came across many blogs and bloggers.
After looking at their blogs and blogging help they have asked for I decided to write this post about blogging tips so that by using these blogging tips they can do better blogging and make their blog better.

You may already have a blog or want to start a new blog so I will list my tips starting from choosing the blog name (domain name)

Please read following 25 blogging tips to build better blog .

Group #1 - Blogging tips for starting a new blog or writing new post.These are important for search engine optimization.

1) First do the keyword research for the blog topic / subject . Please read my post on keyword research .Finding popular keywords related to your blog or your post topic is must.

2) Try to use the keywords in domain name, blog title, post title, post content,hyper link , ALT tag, TITLE tag etc.in a natural way.This will help you to get higher search engine ranking.

3) Try to limit no. of your labels / categories around 20. Use tag cloud or label cloud if you want to save space. If you have many topics on one blog try to regroup and relabel. If totally different topics are mixed on one blog and has sufficient no. of posts for each topic then start new blog for that topic.

4)Do not copy old posts of a blog on new blog.You can get penalized for duplicate content. You need to remove old copy from the search engine and then add same post at new blog.

5) Use post title optimization widget on this blog for blogger / blogspot blog so that you get better search engine ranking. Wordpress bloggers can use plugin like All in one SEO for meta tag and title optimization.


Group #2 - Blogging tips related to look and content of the blog.

6) The look and layout of the blog should be nice, neat and beautiful so that it can create good impression on the visitor and he should feel to stay more and visit again. Content quality should also be good for this.

7) Navigation and layout should be such that visitor should be able to find the recent posts, labels very easily. So if Recent posts and Labels are near top of side bar it will be visible in first screen of the blog and the visitor will have a quick idea of what the blog is about and can jump to his topic of interest quickly.

8) Use pictures , images wherever possible to make your post colorful and attractive.
Do picture / image optimization as described in my earlier post. No need to use large images , you can use medium to small images .

9) Loading time of the blog should not be very long or visitor will run away before the page opens. So keep check on what widgets / code you are installing and does it slows down the loading. If you are loading pictures , make sure that the file size is not big .Do not use BMP files , you can use jpg , png files. Also check image size. You can do all this using photoshop. As sometimes images load slower from external sources , check that also.

Group #3 - Blogging tips related to writing and visitors

10) Write your post after proper research and gathering total information . Do not write too long.
Use grouping , paragraph , sub titling for arranging the information in post body.

11) Writing language should be easy to understand and wherever possible write in humorous way. If visitor enjoys your post he will come back.

12) Give links to useful resources related to your topic. Also give links to your earlier posts with proper anchor text wherever possible. This improves internal linking of your blog.

13) Encourage the reader to participate / comment . You can also run some contest or survey on your blog and keep some prize for that.

14) Use beautiful and professional looking theme / template and header image for your blog.
There are many free templates available so you can easily get one suitable to your blog.
Choose 3 column template which uses full 1024 X 768 resolution.This gives you more space.

15) The font color and size should be such that blog should be readable in different screen resolution.

Group #4 - Blogging tips to increase readers and revenue.

16) Burn your feed at feedburner and provide subscribe via email facility for your RSS feed .

17) Check your blog visibility and feed in different browser. Especially in internet explorer and firefox.

18) Try to increase your RSS feed subscriber and use adsense for feed to display google adsense on the feed.

19) Use google adsense or other advertisements in post body , right hand side bar and below the header . Use adsense link unit with labels or links or below header. Match background color of adsense with blog or post background color.

20) Read my post on blog traffic tips to build traffic from sources other than search engine.

Group #5 - Following are precautionary blogging tips (what not to do)

21) There should not be many outgoing links (pointing to other websites / blogs) in the post or side bar. Remove unnecessary outgoing links. Place all outgoing links near bottom of right hand side bar or footer.

22 ) Do not buy or sell links for link building.

23) If paid posts are must for you keep it minimum or have separate website / blog for paid posts or articles.

24) As said above do not write same post again ( duplicate content ) . Do not edit old post titles and content for search engine optimization .

25) Do not have METATAGS only for main home url of blogger blog , as it will be used for all the post and you will get duplicate metatag error in google webmaster tools. You are also misguiding and confusing search engine by having same meta tag for all posts . So you can use script / widget which can give different METATAGS to individual posts. Wordpress blogger can have METATAG for individual post by using All in one SEO plugin.

I hope these blogging tips covers all important aspects of blogging . Please write your comments and any tips you have !

Thursday, May 21, 2009

Add adsense ad, link unit or page element below header

Many blogs have good blogger template and they want to add the google adsense link unit or google adsense ad below header or title. How to do it?

For this purpose either they can change the whole template or do the simple html code editing mentioned here. This widget / trick actually gives additional 'Add gadget' (add page element) option above the header.

Go to your Dashboard > layout > edit HTML > then search for

<div id='header-wrapper'>
<b:section class='header' id='header' maxwidgets='1' showaddelement='no'>
<b:widget id='Header1' locked='true' title='your blog title (Header)' type='Header'/>
</b:section>
</div>

Now you need to edit this code as shown below

change maxwidgets='2'
change showaddelement='yes'
change locked='false'

your code should now look like this

<div id='header-wrapper'>
<b:section class='header' id='header' maxwidgets='2' showaddelement='yes'>
<b:widget id='Header1' locked='false' title='your blog title (Header)' type='Header'/>
</b:section>

Now go to Layout , you will find Add a gadget option above the header . Now click on it and you can add adsense link unit or ad unit or some other gadget. Then click save.

Your adsense ad will start showing above the header.

But suppose you want it below the header then how to do it ?

Sometimes you can not drag it in layout screen . So again go to Edit HTML and search for the code and then swap the lines as shown below and then click save. Now your ad unit is below the header.

<div id='header-wrapper'>
<b:section class='header' id='header' maxwidgets='2' showaddelement='yes'>

<b:widget id='Header1' locked='false' title='your blog title (Header)' type='Header'/>
<b:widget id='AdSense1' locked='false' title='' type='AdSense'/>
</b:section>

Sunday, May 17, 2009

Show total posts - total comments script widget

On right hand side column of this blog traffic tips blog you can see total number of posts and total number of comments.

How to show total number posts and/or total number of comments on your blogger blog ?

Here is script to show total number of posts and comments . You have to add this java script
by going to Dashboard > Layout > Add a gadget > HTML /Java script

Then copy following java script .

Please change blog url from www.blogtraffictips.net to yourname.blogspot.com in the following script.


<script src="http://www.blogtraffictips.net/feeds/posts/default?orderby=published&alt=json-in-script&callback=rp"></script>

<script style="text/javascript">
function numberOfPosts(json) {
document.write('Total number of Posts: <b>' + json.feed.openSearch$totalResults.$t + '</b><br>');
}
</script>
<script src="http://www.blogtraffictips.net/feeds/posts/default?alt=json-in-script&callback=numberOfPosts"></script>


<script src="http://www.blogtraffictips.net/feeds/comments/default?orderby=published&alt=json-in-script&callback=rp"></script>

<script style="text/javascript">
function numberOfComments(json) {
document.write('Total number of Comments: <b>' + json.feed.openSearch$totalResults.$t + '</b><br>');
}
</script>
<script src="http://www.blogtraffictips.net/feeds/comments/default?alt=json-in-script&callback=numberOfComments"></script>


The first half can be used to display only total no. of posts and second half can be used to display only total no. of comments.

Post title optimization for blogger blog

Earlier I have written two posts for title optimization - What is title optimization and Title optimization widget

But there was one problem with this widget . After installing this widget one can not shift the page elements , it gives error when you click on save after shifting.
So there was request to find a error free title optimization widget or script.

First we will understand what is post title optimization . Normally the title of the post appears on top of browser as Blog title + Post title . i.e. the title of this post will normally appear as
Blog traffic tips to make money : Post title optimization for blogger blog . But since title optimization is done on this blog it appears as only Post title optimization for blogger blog. This is important to get proper weightage in search engine for the keywords used in post title.

Now how to do this ?

Go to Dashboard> Layout > Edit HTML
Then search for


<title><data:blog.pageTitle/></title>


Then replace it with following code
<b:if cond='data:blog.pageType == "index"'>
<title><data:blog.title/></title>
<b:else/>
<title><data:blog.pageName/></title>
</b:if>

Then click on Save template . Your post title optimization is done.

Now check the individual post of the blog . And look at top of the browser for title .


Sunday, May 10, 2009

How to shift to custom domain

You must have noticed the new domain name www.blogtraffictips.net for this blog and I thought the whole experience will be useful to my blogger friends and hence writing this post.

You can buy domain name of yours from any domain registering company , the pricing are ranging from $5 to $10 (lees with hosting packages) per year. But if you buy from any company other than google/blogger dashboard than you need to change CNAME record in the domain name control panel.

Now how to shift to custom domain using our blogger dashboard ?

From dashboard go to settings> publishing > then click on switch to custom domain >
Now you have to choose the domain name , the extension available are .com, .org , .net, .biz, .info

Please see the picture below ( click to enlarge )

custom-domain
After choosing the domain name , you have to make the sign up and payment procedure.

Your custom domain name starts working within few minutes . (my experience) .

Now what are the advantages and disadvantage of shifting to custom domain ?

Benefits or advantages of shifting to custom domain

1) You get your unique identity for your blog owned by you. Makes you also feel little better.
2) You get more and better advertisers . You may get higher paying cpc or ppc ads .
3) Many advertising network programs do not allow publishers with free domain , so you get approved there.

As your old url will be there in search engines , blog directories etc. what about the traffic coming from all these sources to your old url ? There is no need to worry as blogger / blogspot gives you facility of redirecting all your traffic to new custom doamin url .

Disadvantages

Are there any ? yes

You have all you internal and external links in posts, blog directories etc. pointing to your old url ( yourname.blogspot.com) so it is better to change it to your new custom domain name (yourname.com) . Please check your blog is pointing to http://yourname.com or http://www.yourname.com and use the new url accordingly. it is important from search engine point of view.

Now think of what happens to your search engine entries and ranking and also alexa rankings ?

Awaiting your comments ....

Tuesday, March 3, 2009

Privacy Policy

We use third-party advertising companies to serve ads when you visit our website. These companies may use information (not including your name, address, email address, or telephone number) about your visits to this and other websites in order to provide advertisements about goods and services of interest to you.

  • Google, as a third party vendor, uses cookies to serve ads on this site.
  • Google's use of the DART cookie enables it to serve ads to users of this site based on their visit to this sites and other sites on the Internet.
  • Users may opt out of the use of the DART cookie by visiting the Google ad and content network privacy policy.

Monday, January 5, 2009

How to change Blogger blog template

Personally I feel three column blogger templates are better and I have mentioned resources for free blogger templates in my earlier post free-blogger-templates-resources

So you may want to change your blogger blog template to a better professional looking template and here is guide for it.


To change blog template please follow the following steps

Steps for installing default blogger templates

1) After login to your blogger account go to

Dashboard > Layout > Pick new template

Then you can choose from available templates on blogger.com and click Save template.
You need to save widgets before doing this as mentioned below.

Steps for installing third party blogger templates

1) Suppose you want to install some other third party template which is not on blogger website.
Then you can download the template you like from the website and can save that template on your hard drive .

2) Then you need to backup your original template first. For this from Dashboard go to > Layout > Edit HTML > Download full template > choose save to disk and save it on your hard disk.
This backup is helpful if anything goes wrong with new template.

3) Now when we change template , the widgets are lost .Widgets are your added page elements like visitors counter , html script , link list etc. So you need to download code of each widget properly name it and save it with notepad as a text file. To copy code of each widget you need to go to Page elements then edit and you can view the code of respective page element which you can copy and then paste in Notepad.

4) Now go to Dashboard > Layout > Edit HTML > Browse
Choose saved template from your hard disk and click Upload.
This will give you warning for widgets to be deleted.
Then you can continue with save template.
Your new template is installed , so view your blog and check it

5) Now start installing each widgets you have saved earlier by going to Page Elements > Add a Gadget.

Hope this post is useful and works out.

Visit blogadda.com to discover Indian blogs

blog directory